

The second part (Virtual Spaces Creating Tools) and the third part (Linking Tools) of the palette can be collapsed by clicking on the header. In collapsed state only the header is visible (see image below). Click on the header again to expand the corresponding tool palette part again.

Attention: The above screenshot is taken from a later version of Virtual Spaces then the other screenshots on this page. Up to version 0.92.10Beta the heading of the second part is Virtual Space and the heading of the third part is Links. From version 0.92.11Beta on the heading of the second part is Virtual Spaces Creation Tools and the heading of the third part is Linking Tools.
Common tools
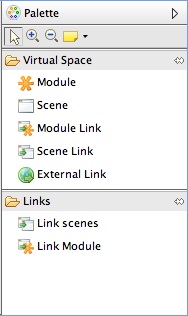
The palette consists of three parts. Part one (see image below) contains the following four tools:

- The cursor tool
If this tool is activated, the elements in the editor can be selected and moved. This tool is needed to e.g. edit the propeties of an element. - The zoom in tool
This tool is used to zoom in on the editor. To zoom in you can also use the drop down menu in the upper right corner of the application. - The zoom out tool
This tool is used to zoom out of the editor. To zoom out you can also use the drop down menu in the upper right corner of the application. - The note tool
The note tool can be used to add notes to the elements. Such notes are not part of the model. That means they are not considered in the generation processes and therefore they are not included in the generated files.To add a note click on the note icon (and release) and then click somewhere in the editor. A text input field pops up where notes can be entered. If you click on the small arrow next to the note icon a drop down menu opens with two different types of notes. One type has a graphical presentation, the other type is displayed as plain text.
Notice: If the zoom factor is to small (e.g. 25%) the entered text is too small to be read. Use the zoom in tool or the zoom menu in the upper right corner to zoom in on the editor to read the text.
You can connect an element in the editor with a note. Use the third drop down menu entry (
Node Attachment) of the note menu for that. To connect an element with a note, selectNode Attachment. Then click on the element and do not release the mouse button. Move the mouse over the note that is to be connected and release the mouse button. The cursor should show if the note can be selected with an appropriate symbol.
Element creation tools
The second part of the palette (see image below) contains the elements that can be created in the main editor. The heading of this part is up to version 0.92.10Beta Virtual Space. In the following versions the heading is Virtual Spaces Creation Tools.
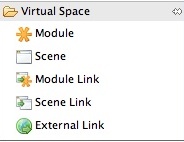
To create one of the elements click on the element symbol in the palette (and release) and then click somewhere in the editor. The element is created where you clicked. While you move the mouse the cursor should give you a hint (using a symbol) if the element can be created on the position of the mouse.
Scenes and Modules can be created directly on the background of the editor. To create one of these elements you can also double click on the symbol in the palette. The element is then created in a default place on the editor.
Links (Scene Link, Module Link and External Link) can only be created on Scenes. To create a link click on the symbol of the link in the palette (and release). Then click somewhere on the background image of a Scene. The link is created on the position where you clicked.
Linking tools
Part three of the palette contains tools to connect links. The heading of this part is up to version 0.92.10Beta Links. In the following versions the heading is Linking Tools.
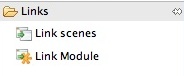
Scene Links must be connected with a Scene. Module Links must be connected to a Module. To connect a Scene Link with a Scene select (click and release) Link scenes. Then click on the Scene Link (do not release the mouse button) and move the mouse over the Scene to be selected with the Scene Link. Release the mouse button. A line should be visible now that represents the connection. To connect Module Links and Modules do the same but use Link Module. You can also connect Scene Links with Scenes using the drop down menu for the property Scene Link Target in the properties view.