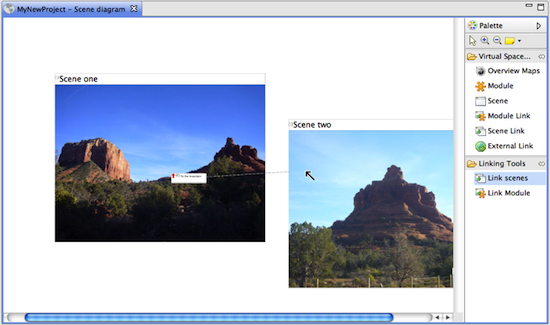
Step 3 - Linking Scenes
We have now two scenes that we want to link (so that a user can navigate from one scene to the other in the virtual tour we generate later).- Choose
Scene Linkfrom the palette and click on it. Then click somewhere on the background image in "Scene one". A scene link will be created at the position you've clicked. - An editor field opens to enter a title for the link. Enter "To the mountain" and hit enter. You have now a rectangle on the background image that contains the title of the link.

- There are three ways of linking a scene link to a scene. Choose one.
- Click on
Link scenesin the palette (in the categoryLinking tools). Move your mouse over the scene link. Click the mouse and hold it down. Move the mouse over the scene you want to link and release the mouse.
The cursor gives you hints on what elements you can link. If you try to link an element that you can't link, the cursor looks like this:

- Move your mouse over the scene link. After a moment there should appear two arrows at the border of the link. One arrow pointing to the link, one pointing away from it. Click on the one pointing away from the link, hold it and move it over the other scene. Release the mouse.

- Select the scene link you want to link. Go to the "properties view". The properties view is located below the scene diagram. It looks like this:

At the top of the view you can see what element you've selected. Below it you find the properties of the element.

In the column labeled
Value, select the row that starts withScene. At the end of the row a button appears. Click on it to open a drop down menu. Click on the scene you want to link (in this example "Scene two") and hit "enter".
- Click on

